Saturday, May 14, 2022

Last Autocross For A Few Months

I was still a bit tired from yesterday's track day but today was the last autocross at NNJR for at least a few months since I'm not running the SCCA ProSolo next weekend. The weather looked like it was going to hold so I couldn't pass up the opportunity.

NNJR SCCA - Metlife Stadium - 5-14-2022

This time I set the tire pressures to the correct pressures based on previous notes of 27psi all around and I was really enjoying the grip and balance. The course was a bit technical but still fast. Gave a few folks a ride along which was also fun (aka Enabling 101). Ironically I set my fastest time with Jenna Farkas in the car. Having issues with one of my GoPros randomly dropping frames so this combined video looks weird even though they start in sync but it is what it is. Had an absolute blast and I'm definitely glad I signed up for today's event.

NNJR SCCA - 5-14-2022
Taking Jenna for a ride

I have a new set of Bridgestone RE-71RS tires on order so I'm looking forward to seeing how those will stack up against the A052s. I know it's supposed to have a bit less grip but I'll be going from a 235/265 to a 255/275 in hopes of getting better stopping distances which is something I definitely notice when I hop back into the Cayman from the S2000 which runs 255 square. 

Friday, May 13, 2022

NYST Uptown with S2K Takeover

After my disappointing time at Lime Rock last month that was cut short by oil pressure issues, I was excited to get back out on track again. Although I had no issues at the autocross last month after replacing the oil pressure sender and fixing the wiring, only doing long track runs would really tell me if I fixed it. The 18 corners in about 2.5 miles at NYST is a sure fire way to make sure we're truly in the clear.

NYST Uptown - 5-13-2022

I took the first two sessions as installation sessions to both make sure my oil pressure issues were gone but to also feel out the Continental ExtremeContact Force. Glad to say not a single warning light even as much as blipped. For the tires, I was expecting lower grip and the back definitely wanted to slide out a bit more under trail braking now. I had to catch the rear several times on the first two sessions. I took out some rear pressure ending up 30psi front and 28psi rear cold and that really helped the rear settle down. I was able to push harder slowly work towards finding the limits. 

Bumblestook @ NYST Uptown - 1:43.9

Although they do hit a peak, they tend to plateau and stay there. Even with a bitch first sector and having to slow a bit to deal with track debris, I was able to get to within a few tenths of my personal best on Yokohamas. There was definitely more pace out there but some minor incidents in each session that resulted in track debris put a damper on really seeing what they could do. Overall I'm super satisfied with this tire choice. They're not going to win you any time trials but if you want a track tire that has consistent feel each lap once they hit their peak, this is one tire to consider. 

The old track crew

It was also great to see Rad and Dhariel back out on track. Last time we went to the track together was almost 13 years ago. Also great seeing some OG S2K faces I hadn't seen in a minute and practice my mind blowing magic tricks. 

Buncha weirdos
NYST Uptime
Photo By: Peter Levins


Friday, May 6, 2022

Bestop Twill Sunrider for Hardtop

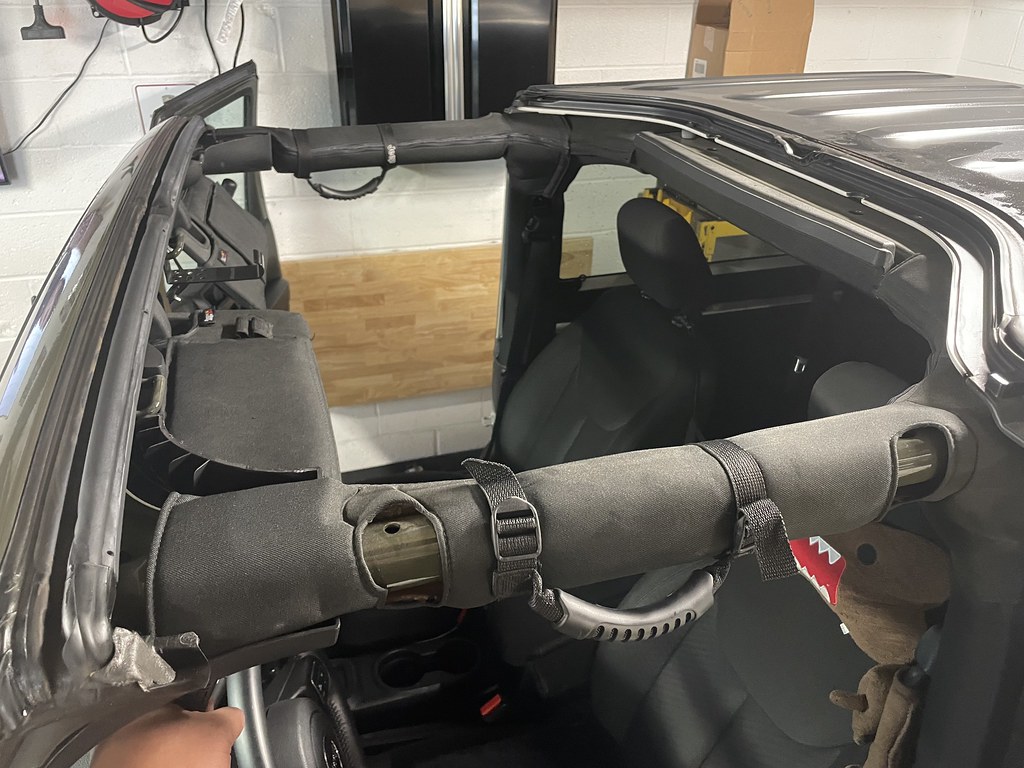
Now that the weather's starting to warm up we've been enjoying taking the freedom panels off the Jeep when going for drives. We normally put the panels in a storage bag and stick it in the back in case we need to put it back on if it rains or gets cold. While this process isn't hard, it's still a bit cumbersome and getting those panels into the storage bag can be a bit of a pain if you're doing it solo. What we really needed was some some kind of soft top just for the front part of the Jeep since we like to keep the hardtop on. Thankfully, Bestop makes one called the Sunrider. We got it in twill which is a very nice black thick cloth, the kind you might see on a very nice convertible. Installation was fairly easy at about an hour and required some basic tools and no non-reversible modifications to the Jeep. 

Freedom panels removed

The first step is to remove the freedom panels. Then you can install the side rails which bolt up to the factory rollbar for a very secure fit using big threaded knobs making it a tool-less endeavor. You then lay the actual sunrider on top and use more threaded knobs to secure it into place and reuses the factory mushroom knob that would normally secure the freedom panels to hold down the center portion. 

Top installed and bolted down

The only tool you need is a T30 Torx bit. I was happy to see this since I saw some reviews online where people complained about the 4mm allen bolts they previously used rounding out and being hard to remove later without drilling the bolts out. The T30 torx holds down some extra brackets to secure the rear of the top.

Rear Brackets

Since it was bit colder today, it took a moment to get the cloth stretched out so I could actually close the top. I didn't want to force it so I let it naturally and slowly stretch on its own in the garage.

Top fully installed, stretched out and closed

Overall I'd say the install was very easy and I'm happy with the results. It raining out so it'll be a good test of how good the seals are. This jeep has no leaks whatsoever and hopefully this won't change that but only time will tell. For now, just glad that we'll be able to open and close the top easily anytime we want to enjoy some open air. This should be fine to leave on or the winter too but it's easy enough to remove and put back the freedom panels if we choose to later.

Saturday, April 30, 2022

First Autocross with the DSC Sport Controller

Over the winter I installed the DSC sport controller and 3-axis accelerometer in the Cayman but never got around to properly testing it. An autocross with the NNJR SCCA seemed like the best way to really put it to the test. I completely forgot what tire pressures I run which apparently was supposed to be 27psi all around based on my old notes but I initially ran 30/32psi which made the car extremely loose. I lowered it down to 30/31psi and that made it more balanced especially as the tires heated up. 

NNJR SCCA Autocross - 4-30-2022

Let's forget about tire pressures for a second and let me focus on my observations about the DSC sport controller. I could immediately tell that it was able to handle bumps and undulations much better than before and the nose didn't dive as much under braking. It's definitely a big help but my two year old Yokohamas are starting to show their age. I felt that the dampers were capable of so much more but the tires couldn't give me the grip I needed. Under braking, the 235s up front just aren't enough to get the car slowed down fast enough and I kept overshooting corners probably made worse by the fact that I've been driving the S2000 more which has much shorter braking distances. This hurt me in the transition as well as the reduced lateral grip made it hard to quickly change directions in the slaloms. The tires are worn enough that I should probably get new ones soon so I may change my tire sizes to have a more optimal setup.


NNJR SCCA Autocross - 4-30-2022

Also, since I can no longer run in STU with the Bilstein Damptronics coilovers with the DSC sport controller, I've started to run in XS-A (Extreme Sport A) instead. This is convenient because technically all my other autocross capable such as the S2000 and 911 are all legal in this class as well which mean I just need one set of numbers and class letters and I can just choose which ever car I want to have fun with on any given weekend. 

Saturday, April 16, 2022

First Autocross of 2022 - Oil and Tire Testing

I wanted to see if the fixes I made to Bumblestook resolved my oil pressure reading issues so the first autocross of 2022 with the NNJR SCCA seemed like the perfect place to give it a go. It would also be a great way to test out how the new Continental ExtremeContact Force would be as an autocross tire. 

NNJR SCCA - 4-16-2022

The first good news is that it seems that my oil pressure issues are gone. I got the oil nice and hot and really pushed the car and not once did the oil warning light go on. Since my head and eyes are constantly moving around at an autocross course, I checked my videos just to make sure I didn't miss any occurrences of it and I'm glad to report there were none.

Bumblestook @ NNJR SCCA Autocross - 4-16-2022

As far as tire testing was concerned, I will say that these tires live up to their "Enduro" focus in that they take quite a while to get up to temp (about 4 runs in 70F ambient temperatures, single driver) but they did seem to be ok with heat after that. I also found that they liked lower pressures and ended up running 28psi front and 27psi rear to get neutral balance. They tended to be a make a bit more noise at the limit than I'm used to with the Yokohama A052 but I think that's fine because I could use it to easily hear when I was at the limit of grip. Overall, I think they're decent summer tires but are far better suited for track use which isn't surprising at all since that's what they were made for. 

Monday, April 11, 2022

Jeep Cooling Upgrades

The plastic ended radiators on JKs are known to crack and leak over time. I'd rather not wait for stuff break especially since this is my wife's truck so I had SJF Performance put in some preventative upgrades for me so I wouldn't have to worry about anything later. The radiator was replaced with a more efficient Mishimoto all aluminum radiator. New Mishimoto silicon radiator hoses and a new 203F thermostat was also put in while it was out. Unfortunately, this radiator doesn't have all the same brackets as factory so it's not quite a direct replacement but it does, otherwise, fit in quite well.

New coolant getting vacuum filled in

The heater core failure is also fairly common on these Jeeps and I definitely don't want to have to replace that later. Regular coolant flushes seem to be the recommended preventative maintenance for that. Of course, a new radiator means new coolant going in anyway so getting that maintenance out of the way worked out nicely too. I just went with standard Mopar OAT purple coolant here which is what they recommend for 2013+ Jeeps. SJF noted that he pressure tested the coolant system prior to filling and it held vacuum extremely well (no movement in the needle whatsoever) so I know everything is sealed nicely. 
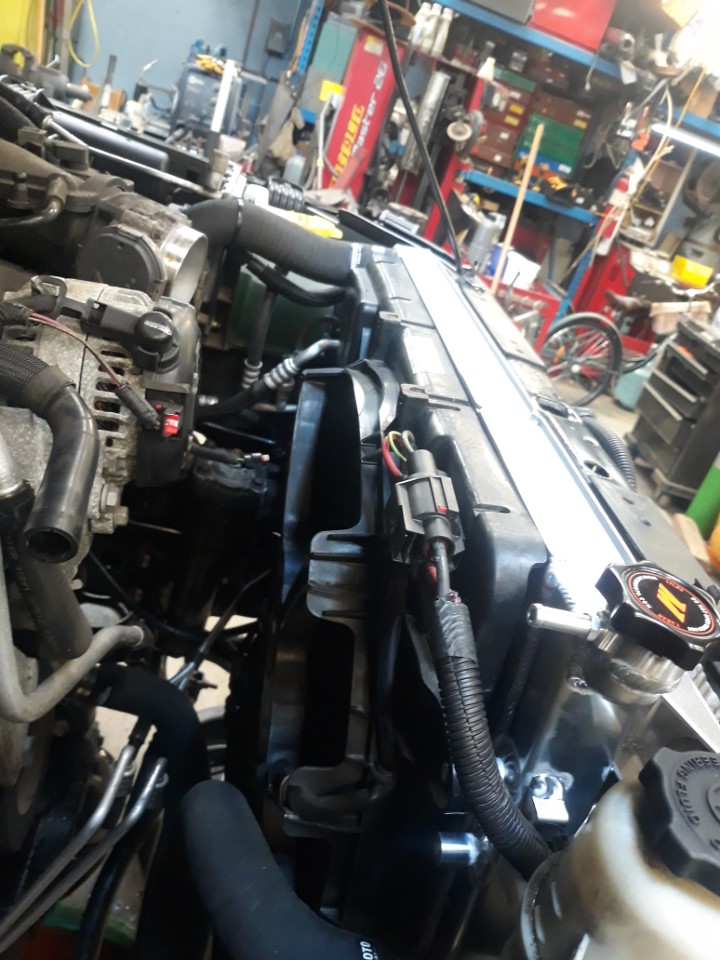
New thermostat, radiator and hoses installed

New thermostat, radiator and hoses installed

One of the things we notice every time the Jeep is on the lift is that there seems to be quite a lot of tension on the brake lines with the wheels hanging down. This is no good for when we take the car off road since at maximum articulation, even at stock height, having something pull on a brake line is the last thing you want. My initial plan was to replace them with stainless braided lines but everyone that makes stainless lines for the Jeep designs them for a lifted setup. It was clear that those were going to be too long since we're sticking with stock height so we just put in fresh OEM style brake lines and got relocation brackets to move the line further down a few inches to give the necessary slack needed to avoid turning the brake line into a musical instrument. 

Brake line relocation


The Jeep now runs a bit cooler and we're ready for some off road fun in May without any further brake concerns.

Maintenance Update:

Mileage: 70,463

- New Mishimoto Radiator 
- New Mishimoto upper and lower silicon radiator hoses
- New 203F thermostat
- Approximately 2.5 Gallons of Mopar OAT purple coolant
- New OEM style rubber brake lines
- Brake fluid flush with Bosch ESI6-32N DOT 5.1 Brake Fluid
- Diff fluid change front and rear with Royal Purple MaxGear 75W-90 (1 qt front, 2 quarts rear)


Friday, April 8, 2022

Oil Pressure Sensor Fixes

My new oil pressure sender arrived the other day so last night while it was pouring out I thought it'd be a good time to get the car back together.

New AEM 100psi oil pressure sender

Since I applied a dab of hondabond on the threads to seal it better, I'd have to give it enough time to dry so letting it sit overnight was going to work well. 

New oil pressure sender installed

Since I took the VTEC solenoid apart last week, I ordered a new gasket kit from Kraken Automotive. I was surprised that the 17 year old gaskets that were in there were still pretty flexible and in decent shape. Still, rubber does eventually break down so getting this replaced now is probably a good thing. I applied a bit of fresh oil on the gasket and made sure it was all lined up, then torqued all the 10mm bolts down to 12Nm.

New VTEC solenoid gaskets

New lower gasket with screen installed.
Upper gasket also installed but not pictured

I double checked the wire going to the oil pressure sender and found two spots where the insulation had worn through. This might have actually been the cause of my issues. I taped them up and re-routes my wires to avoid this happening again.

Frayed insulation
More frayed insulation

Everything back together

During lunch today I put in fresh oil and took her out for a drive. Everything still works. I checked for leaks and there were none. Once warmed up I did a few pulls in VTEC and it was pulling hard with no problems at all. So far so good. I just need to put her through her paces and see if the problem reoccurs on track. I also got an 8GB MicroSD card for my IQ3 datalogger dash so that if this happens again I can look at the telemetry to see what I might not be catching on the screen. 

MicroSD installed ready to datalog

Maintenance Update:

Mileage: 60,875

- 6 quarts Amsoil 10W-30
- 1 new Honda oil filter (15400-PCX-306)
- 1 new AEM 100psi stainless oil pressure sender
- New VTEC solenoid gaskets (upper and lower)