While I was on the maintenance binge this past week I went ahead and changed the oil on the Cayman as well. 8mm hex socket to remove the drain bolt then tightened to 37ft-lb. Nothing really eventful here other than to remind myself to check under the car before lowering the car before driving off. I accidentally forgot to remove the drain pan under the car and was wondering why I was hearing a scraping sound as I drove out of the garage. Turns out I was dragging the drain pan under it and spilled a bit of oil as a result on the garage and driveway. Lesson learned.
I always like to start the season with some fresh oil. I've been running Driven DT-50 on Scarlett for some time now but decided to give GP-1 a try next. Unlike DT-50 which is a pure synthetic, GP-1 is synthetic blended with Pennsylvania Grade base dinosaur oil given it a green color. It's supposed to be quite good for classic air cooled cars and includes a high amount of ZDDP.
Driven GP-1
I really love using my Raceramp wheel cribs for this stuff. With the oil lines running through the passenger side of this car, it's a bit hard to place the pucks exactly right if I try to lift it using the QuickJack. With this setup, I can get it off the ground high enough and just let it rest on the wheels.
Draining the oil
Draining the oil
I let it drain overnight to make sure I got out as much oil as possible. Since I was changing oil types, I wanted to make sure even the oil in the oil cooler and oil cooler lines came out. Normally this would be pretty hard to do but the Elephant Racing finned cooling lines make this an easy job. There's a Schrader valve right after the oil cooler thermostat you can use to inject up to 90psi of air to push the oil through the system for a more thorough purge. That's around 1-2 quarts of extra oil that come out if you do this right.
Schrader valve to push the old oil out
Using compressed air with about 85psi of pressure
Torqued the drain bolts to 31 ft-lb and popped in a fresh Mahle OC-54 oil filter and added 9 quarts to start off with. That pretty much fills that the oil tank and most of the engine but the oil cooler is still empty at this point. Drove the car around for about 10 minutes to get everything up to temp so that the oil cooler valve would open up, then kept checking the oil level while the engine was hot and idling. I had to add a full 3 more quarts. This is a good thing as a completely dry engine and system should be around 12 quarts to fill up so my drain method did in fact get out almost all the oil from the system leaving the dipstick right at around the 3/4 mark.
Fresh Mahle OC-54 oil filter.
Engine's humming along nicely and running very smoothly. Ready to hit the streets near you soon.
Last year wasn't a particularly great year for going to the track with Bumblestook. We had cooling issues, oil leaks, and I bought a house, all of which kind of put a damper on being able to get out on track. I didn't want to miss this year's season opener with S2K Takeover at NJMP Thunderbolt though despite the last minute discovery of a damaged intake cam that I was able to square away earlier this month.
Bang, you're dead LOL - NJMP Thunderbolt - 3-21-2022
With the weather still being pretty bad until last week (snow, salt, etc), it was impossible to actually test the car to make sure it was going to run correctly. I was able to give the car a proper drive the day before the track day and everything seemed to run fine. The valve train was a bit on the noisy side from what I remember but everything sounds noisy to me after the winter when all I drive are the comparatively quiet street cars.
On Track - NJMP Thunderbolt - 3-21-2022
The morning was still quite cool so I took it relatively easy the first session to give everything a systems check. The engine seemed to run just fine for 20 minutes at high rpms. Nothing blew up. The tires were holding up nicely. On the second session, I pushed a little harder. We did a 1:38 which was a bit meh but not too bad considering I knew where I was leaving time out there by not being aggressive enough. One thing I did notice was that the A052s really struggled after about 3-4 laps once you got them really hot. I feel like they're a fast tire but more like a qualifying tire. If you don't get a clear track in the first 3-4 laps, you're done. I tried to push really hard on my later laps and got nothing but understeer and lack of confidence that the front wouldn't bite. I still attempted a full send through turn 3 and found myself on the wrong side of the exit curbing. Thankfully I was able to just keep it nice and straight and return to the track with little fanfare but that incident made me a bit timid the rest of the day.
Waiting for the green flag
After lunch we set off again but only a few laps in, we were all black flagged due to a few cars breaking down and needing a tow back so that was pretty much lost. We finally got a good 30 minute session in afterwards but I kept noticing that my oil pressure warning light constantly randomly blinking and I stopped really pushing as I wanted to preserve the engine. I didn't feel or hear anything wrong with the car so I thought maybe it's just a sensor issue. Still, seeing that wasn't comforting and distracting. I drove to the track, I needed to make sure I could drive the car home!
On Track - NJMP Thunderbolt - 3-21-2022
I was so worried I wouldn't wake up early enough to make it to the track on time that I couldn't sleep the night before. I was starting to pay for this in the afternoon so I called it quits and skipped the final session to head home. Glad I did as I was a bit delirious and barely stayed away for the 2.5 hours it took me to get back. After talking with Christian at the track about whether my valve train noise was normal, he suggested I recheck my valve lash. The valve train was definitely a bit noisier than it should have been so I had perhaps set the lash on the looser side.
Re-adjusting Valve Lash
Now that I think about it, I wonder if the added valve train noise was causing some issue with the sensor. It was also suggested to me that the OEM sensor wire, which was disconnected since I have an aftermarket sensor, might be contacting the block while I was driving causing it to ground and trigger. I reset the valve lash to "Billman" spec, which he recommends to be 0.008" for the intake side and 0.010" on the exhaust side. The lash I previous set was within spec but on the looser end of the scale. Setting it to this new spec definitely quieted the valve train up to a proper stock sound. I also tape over and zip tied the unused OEM sensor wire to make sure would be no chance it would ground itself in the future.
Taping over the OEM oil pressure sensor wire
I checked under the car and there was also no damage from my little dirt excursion off turn 3 but it was quite dirty so had the car washed to get rid of all the evidence of hooning.
Getting nice and clean - 3-22-2022
Overall, I'm very happy with the event and how the car performed. I would've liked to be able to push harder and get my times lower. Hopefully I've sorted out all my issues for now so I can just focus on driving. I'm also now contemplating getting a separate set of track tires. These A052s are awesome all around and especially for autocross but I need something more consistent on the track. I'm going to try and resist chasing track times though for now because I know that's going to lead down a very slippery slope but I hate coming back from the track wondering what could've been had I been able to rely on consistent grip. Separate tires, means more wheels and we all know what that rabbit hole looks like.
Bumblestook @ NJMP Thunderbolt A little cat and mouse with a fellow S2k owner
Maintenance Update:
Mileage: 60,587
- Valve adjustment (0.008" IN, 0.010" EXT) - New valve cover seals (reused from adjustment made before the track day)
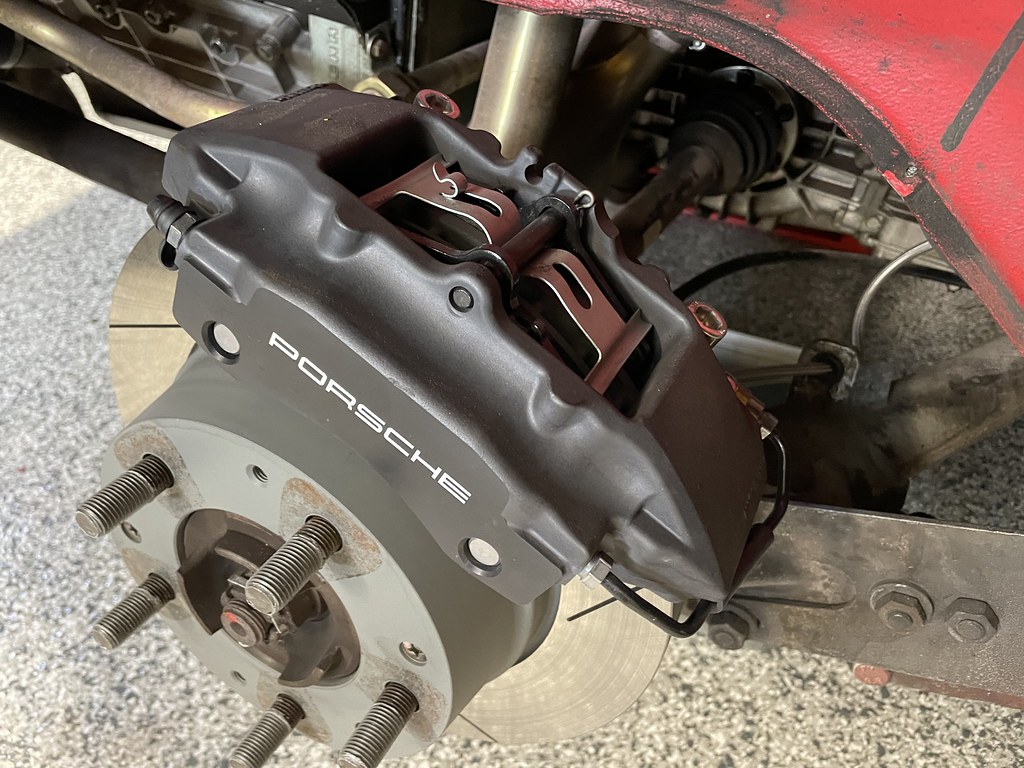
Since about the middle of last summer, I started to notice that at least one of my calipers would seize just a little after being on the brakes for a while. The older 911 calipers were fairly known for this and the logical choice would've been to just replace it with a new OEM caliper or rebuild them. That's not really how I do things especially when there is an opportunity for an appropriate upgrade.
Rear brakes converted to Boxster calipers
In this case, I stumbled upon the Elephant Racing Boxster caliper conversion kit. I was initially just going to order the full kit from Elephant Racing including the caliper, rotors and pads but after consulting with Speedsport Tuning, I had them order just the adapter kit and piece the rest separately so we could better tailor the kit to my needs.
Front brakes converted to Boxster calipers
The kit consists of billet aluminum adapter brackets to adapt the Boxster's axial mounted calipers to the radial mounts of the older air cooled 911s as well as mounting hardware and braided stainless brake lines. These are design to take the base Boxster calipers from 1997-2004. I had them get me new slotted Sebro rotors (from the 3.2 Carrera - 84-89 911) and OEM Textar pads. I could've gone with a more aggressive brake pad compound but it's important to match the pads to the tires, especially on a non-ABS equipped car. Since I run the car on regular Continental DW tires, having an overly aggressive pad would likely be too much and make it easier to lock up the tires under heavy braking.
Clearancing required
There's a little bit of clearancing required to make the brackets work but nothing too crazy. The shop said the hard lines supplied with the kit don't fit really well. They're just a tad too short for comfort so they fabricated correct length lines for me.
New stainless brake lines
New stainless brake lines
Of course, changing out all the brakes like this requires a complete brake bleed. We used standard SL6 DOT4 ATE brake fluid.
Brakes being bled
One of the main reasons I chose to upgrade to modern style calipers is that they are monoblock aluminum, which makes them both lighter and stronger. I could've gone and found some used Boxster calipers to save some money but I had the shop order brand new calipers from Porsche since I felt they were reasonably priced for new OEM calipers anyway. After all the money invested in this vehicle, seems to make little sense skimping out on the most important part of the car...the thing that makes it stop.
Discerning eyes will spot the non-stock calipers behind the Fuchs
Very appropriate OEM+ upgrade
Snarky purists will comment that this isn't really an upgrade and I'd have to agree that yes, from a pure brake performance perspective, the old OEM calipers offer basically the same stopping power (provided they don't bind up). What I do get with this restomod using more modern parts is the improved reliability, decreased weight, and more predictable brake modulation. When it comes to stopping power, having confidence it'll work the same way every time is the most important thing to me.
Looking sweet with her summer setup back on - 3-13-2022
My 83SC has a brake booster and from what I could tell on my long drive home, the pedal feel and balance was still very good. Modulation was easy and it didn't change how the car felt under braking dramatically, which for me, is a good thing. I think if you have a non-brake boosted car, you'd likely have to consider switching to the master cylinder from a 930 turbo to be able to control the larger pistons used in these calipers. I will say that I'm very satisfied with this setup and would highly recommend it for anyone looking to put a more modern brake system into their old air cooled car.
Maintenance Update:
Mileage: 169,654
- 97-04 Base Boxster Calipers
- Sebro slotted front rotors - 91135104123SET
- Sebro slotted rear rotors - 285802CSET
- Textar OEM brake pads
- Elephant Racing Boxster a caliper adapter kit
- Stainless brake lines
- Brake flush and bleed with ATE SL6 DOT4 low viscosity fluid
It's been a few years since Bumblestook's last valve adjustment which was back when she was still a full-fledged BSP car. Since she was already up on race ramp cribs and tucked away for the winter, I figured I'd tackle the valve adjustment. When I started the process I noticed some corrosion on the intake cam underneath where the oil filler cap would be. My current theory is that back when I ran BSP, when the car only ran during events, was on E85, and sat the rest of the time, condensation may have built up under the oil filler cap and wore away the coating on the cam.
Corrosion on the intake cam
Whatever the reason, I'm glad I caught this as this might have resulted in some serious problems later so I went ahead and ordered a new intake cam and everything else attached to it like the cam gear and cam plate. I could've just reused what was attached to the old cam but I wanted to get a fresh set so I could compare my new and old setup and make sure I got it set up correctly.
New intake cam assembled
I'd never done this before but thankfully my trusty S2000 service manual had everything I needed. I torqued the nut holding the cam gear to 118Nm and the bolt holding the cam position pulse plate to 39Nm (left-hand threads). I set cylinder one to TDC where the cam gear markings completely lined up with each other to ensure that I wouldn't mess up timing when I installed the new cam. I then start loosening the bolts holding the camshaft holders in the reverse order they are tightened according to the manual. I wanted to make sure the bolts I removed got reinstalled in the same spot I got them from so I used the box the cam was shipped in to store the bolts so I could remember where each of the 20 bolts came from.
Camshaft holders and intake cam removed
I carefully removed the intake cam and inspected underneath. Thankfully, the corrosion was limited to the cam so I simply applied some fresh oil on the new cam and put it in the same orientation the old cam was in making sure the timing marks were still aligned. I put the camshaft holders back in place and incrementally tightened the bolts in the order specified in the manual (criss-crossing from the center outward) until I eventually torqued them down to 22Nm. Once I was satisfied everything was installed correctly, I then did a valve adjustment setting the intake to 0.23mm and the exhaust to 0.28mm and torqued the locknuts to 20Nm.
New intake cam lined up with exhaust cam
Camshaft holders installed and torqued to spec
One thing I also noticed when I removed my valve cover to do this job was that the paint had started to peel and it was starting to look a bit sad. I dropped it off with my friends at JT Powder Coating while I was waiting for my new cam to arrive. They cleaned up the cast marks, blasted it clean, then put a fresh coat of crinkle red.
Valve cover looking beat up and tired
Back from JT Powder Coating
I got all new seals for the valve cover including new o-rings for the crank position sensors. Unfortunately, I installed the spark plug seals backward and had to redo those since taking them out is a destructive process. Luckily for me, I live only 5 minutes from a Honda dealership that was open and had them in stock but the bad news is that I got raped and had to pay full MSRP. I could've probably just ordered them elsewhere cheaper and just waited a few days to complete this job but frankly, I just wanted to get this done so I just had to suck it up. Lesson learned, if unsure about orientation, go find pictures!.
Everything put back together - 3-5-2022
I tried to start up her but she wouldn't start. For a moment there I was a bit disheartened thinking that I had screwed something up and I looked at all my photos and the manual and tried to remember if I missed anything. Then I remembered I had the car disconnected from the battery tender for weeks now because the garage isn't heated and you're not supposed to charge LiFePO4 batteries below 32F. I plugged in the charger to give it a bit of juice. A little while later I came back and sure enough, she fired up right away. Oil pressure looks good, no leaks anywhere and the engine seems to run ok. I still plan on changing the oil before I go take her out for a full drive but we're one step closer to being ready for the first track day of the season. I also took the opportunity, while everything was out, to go and clean and re-oil the intake filter as well.