Monday, August 31, 2020

More LEDs, Gauge Overlays and other fiddly bits

Since I took the week off, I figured it'd be a good time to get on with the minor modifications I've been procrastinating on. First up was the 3.0 badge I had JimmyT on the Pelican boards make for me. I've been having a thing recently for low key badges that are only visible when you look really closely so I had it coated matte black to be mostly invisible. It'll probably have to be modified in the future since it doesn't sit flush but I wanted to install it before it got lost in the garage somewhere. It was designed to sit inside the slats of the OEM grille so it sits a little high but overall I like how it looks.

3.0 Badge
Next I removed the oil temp/pressure gauge so I could install new overlays that allow me to actually read out the oil temp in Fahrenheit and the pressure in PSI. Unfortunately, I got sent two temperature overlays instead so for now I only installed temperature one. It wasn't too bad but I took a ton of pictures to remember which wires go where since the entire gauge had to pulled out of the car. The overlay method is really nice because it literally just sits on top of the factory oil gauge face once you pull the mechanism out. The alternative is to get a backdate gauge but that also requires a new backdated oil temp sender to be installed. This is far easier and looks just as good. New Vintage USA makes 3 different temperature ranges based on how your stock gauge looks like. Since mine has a "big red" bar on top, I needed the "Style C" overlay face to ensure that the numbers are correct. 

Disconnecting the oi temp/pressure gauge
Stock gauge indicators are a bit vague
New Gauge Overlay from New Vintage USA
Just need to unscrew each gauge and screw the new face on
The engineer in me loves seeing numbers
Fascinatingly enough, now that I see the numbers, that means that in the summer with the AC on, idling in traffic, before I got my new oil cooler setup, I was seeing oil temps as high as 260F yikes. The final thing I wanted to get done today was changing out all the exterior bulbs to LED. Changing bulbs shouldn't really be difficult and frankly it isn't but for this car if you change the exterior turn signal bulbs to LEDs, you need to replace the gauge bulbs with LEDs, redo some wiring and put in a new flasher relay. The flasher relay was supposed to be the easy part especially since I already had the oil temp gauge out of the way but it's also accessible from the frunk. Unfortunately when I went to find it, it was missing.

Um...where's the flasher relay?
It was supposed to be where that little hole right in the middle of the picture above is. I turned my signals on and they were working and I could even hear the relay but I couldn't see it anywhere. Initially I thought that maybe in 83 they relocated it elsewhere so I spent the better part of an hour trying to find pictures. Everything I read said it was supposed to be right there. Finally after reaching behind all the wires and air ducting, I found it. I guess at some point, this relay was replaced but they pulled the little socket from the body and got lazy to re-attach it (to be fair I was lazy to do it too) and just tucked it in there out of the way.

Eureka...found the old relay and installed the one
Now I could proceed to replace the signal bulbs inside the gauge, disconnecting the blue/white signal wires replacing it with the new harness (blue wires).

New gauge turn signal bulbs
New signal bulb wiring harness installed
It was all downhill from there. I just had to go swap out all the exterior bulbs which were nicely labeled by Carmagic. I love how easy it is to swap the exterior bulbs. You just need to unscrew the lenses and they're right there.

New front bulbs
New LED front bulbs installed
New LED rear bulbs installed
I got the polarity right on all the bulbs except for one of the gauge signal bulbs but quickly flipping it over solved that. It was a worthwhile upgrade despite taking far longer than it should have. The lights are much brighter and use far less power. The reverse lights are so bright, it's like having headings on the back of your car.

So bright, so good
I can back up when it's pitch black out now
Overall that was a pretty productive morning. I didn't want to waste the whole day fiddling around with the cars in the garage so I spent a good part of the afternoon taking her out for a nice little drive which is always fun any day of the week. 

Sunday, August 30, 2020

First Autocross in 2020

I can't believe that it's almost been a full year since the last time I autocrossed. Needless to say, I was pretty excited. Becca was there with her 350Z so it gave me some incentive to at least try to drive a little harder.

NNJR SCCA Autocross - 8-30-2020
My early runs were a mess. The car was understeering everywhere and my timing was so off I just kept hitting cones. I was able to clean up my runs but the car still wouldn't rotate easily. After softening the front compression and reducing rear rebound to let the rear work better, it finally started to feel better. I was still trailing a few hundredths of a second going into our final runs but the changes I'd made to the suspension allowed me to attack the course a little harder. I finally broke through and found a tenth of a second to take the lead.

STU Final Results
Looking at the video, it's a horrible mess. I had so much daylight between the car and the cones. The lines were mediocre at best and frankly, if Becca was fully prepped I would've been destroyed. Overall though I enjoyed the fun little battle we had and was just glad to be out there and see everyone again after so many months.

NNJR SCCA Autocross - 8-30-2020

Setup Notes:

Front:
Compression: 4
Rebound: 11
Pressure: 30psi

Rear:
Compression: 9
Rebound: 7
Pressure: 32psi

Wednesday, August 26, 2020

Perfectly Damped - KW Street Comfort

For months now I've been getting increasingly annoyed with the ride quality of the GTi. Regardless of DCC setting it was just too harsh over dips and bumps on the road. Since this is primarily my street car, I wanted the ride quality to be comfortable without sacrificing handling performance. After some research it seemed like the KW Street Comfort coilover setup would solve all these problems. I dropped the car off with Speedsport Tuning this past weekend so they could finish the install and alignment during the week.

KW Street Comfort Installed - 8-26-2020
It took about 2 months to get these made and delivered from Germany but it's really worth it. As with all the KW products, the quality is phenomenal. This setup effectively deletes DCC which is fine because frankly DCC doesn't really do much for this car on stock dampers anyway.

KW Street Comfort
KW Street Comfort
I've had Eibach Prokit springs on stock shocks for a few thousand miles now but the car has over 60K miles overall and the springs simply wore out the factory dampers. It's likely that these springs on a fresh set of dampers might have been manageable but they were clearly no good for the tired old ones. The installation went smoothly and I asked the shop to adjust the ride height to be about 1/4 inch higher over my old lowered ride height since it was a bit too low when going up steeper driveways. I also provided fresh bolts and nuts to replace all one-time use hardware.

Rear dampers and springs installed
Front dampers and springs installed
Suspension getting installed at SST
They adjusted the dampers to about 3/4 stiffness. The front adjusters are easy to get to but basically you can't adjust the rear dampers without either cutting a hole in the panels or removing them so I was hoping it wasn't set too stiff. Front camber was maxed out to -1.3 degrees and zero toe. Rear was set to -1 degree of camber and just a hair of toe in.

Just the right ride height
My first impression after driving it the 60 miles or so home is that these are absolutely perfect for my application. It drives exactly how you'd expect a Euro car to drive; firm but critically damped. It soaks up road imperfections without feeling floaty. Even manhole covers no longer make me cringe. Cornering feels excellent. Body roll is minimal and I'd say the ride quality is comparable to the KW Classics I have installed on the 911SC. I really believe this is how the car should've come out of the factory. Even though DCC is deleted so changing the setting from soft to sport doesn't actually change anything anymore, it's fine because it's basically optimal for both these conditions out of box. KW Suspension does it again and for a mixed duty car with primarily street duty, I'd give this an emphatic 10/10 rating. My only wish was that I had done this sooner. This GTi is now absolutely perfect for what I envisioned a hot hatch should be in terms of power, handling and practicality.

Big thanks to John Darley and the Euro techs at SST for the quick turnaround and making sure things were done exactly as I wanted.

Maintenance Update:

Mileage: 60,295
- New KW Street Comfort Suspension
- New Suspension bolts and nuts

Sunday, August 16, 2020

Simplify and Add Lightness

Now that I'm pretty confident that all my mechanical and electrical issues are fully sorted, it was time to tackle some of the exterior modifications before she goes in for paint in the next month or two. It was a pretty good day to be doing this stuff with SJF Performance. Nice and cool with nasty rain outside made it ideal conditions to just spend the whole day in the garage. First up was deleting the pretty useless fog lights and installing the new club sport lower valence that deletes holes for the OEM foglights. There's nothing wrong per se with the stock SC foglights but I got rid of them for a few reasons. The first is that with LED headlights, I have more than enough illumination that the added foglights don't even register with my eyes when I turn them on. Secondly, unlike the 3.2 Carrera that followed, the foglights stick out on stalks that look like they're an afterthought rather than being tightly integrated into the lower valence.

Foglights deleted, new valence and lip installed - 8-16-2020
The first step was to unscrew the sides of the front black bumper bar cover, then you can just pull it out and try not to break any clips. 4 nuts hold the bumper to the front bumper shocks and then there's two nuts you have to get to from inside the frunk. 

Removing the front bumper
Next you have to remove the side bellows. There are 4 nuts that need to be removed, two holding it to the a little bumper trim and two to the front bumper itself. You only really need to remove the two in the rear going to the bumper trim and then the top nut going to the bumper itself which is in an annoying hard to get spot especially if you have big fender intercooler. SJF figured out it was easiest to get to it from the side if you pull the bellows out slightly. 

Removing the front bellows
With the bumper free from attachments you can start to pull on it forward and it should just come right off. Unfortunately the front signal lights are attached to the bumper so you'll need to detach them by undoing the nuts from behind the bumper and then passing them through the hole. Similarly,  we disconnected the headlight washer hose going to the nozzles.

Front bumper removed
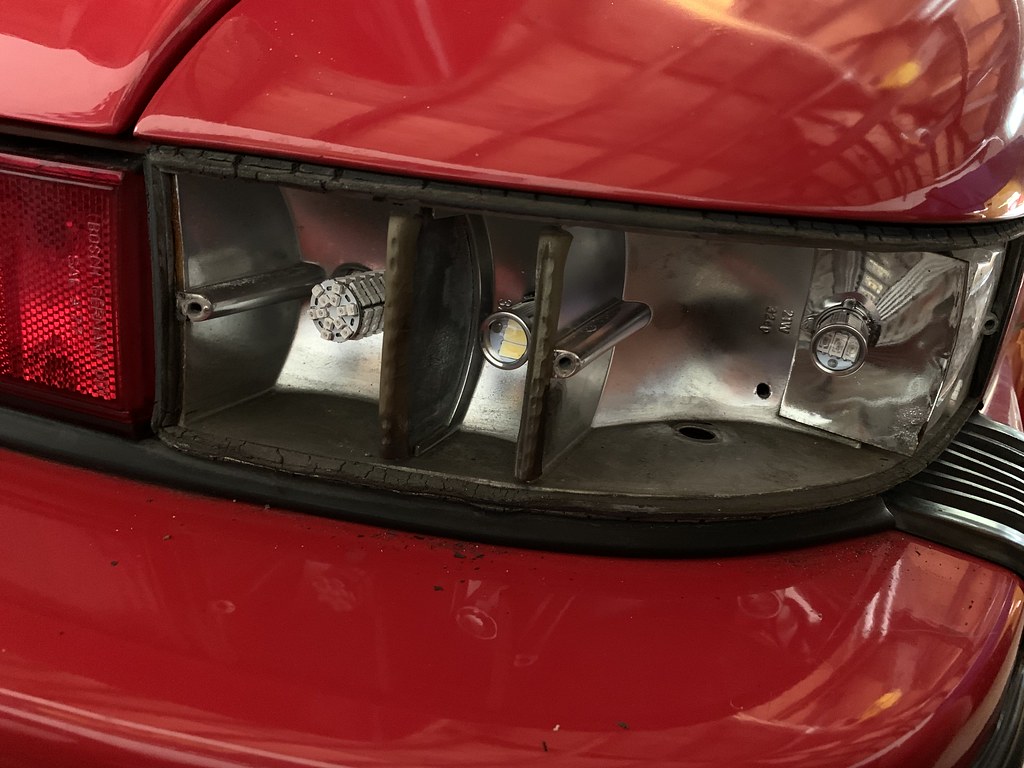
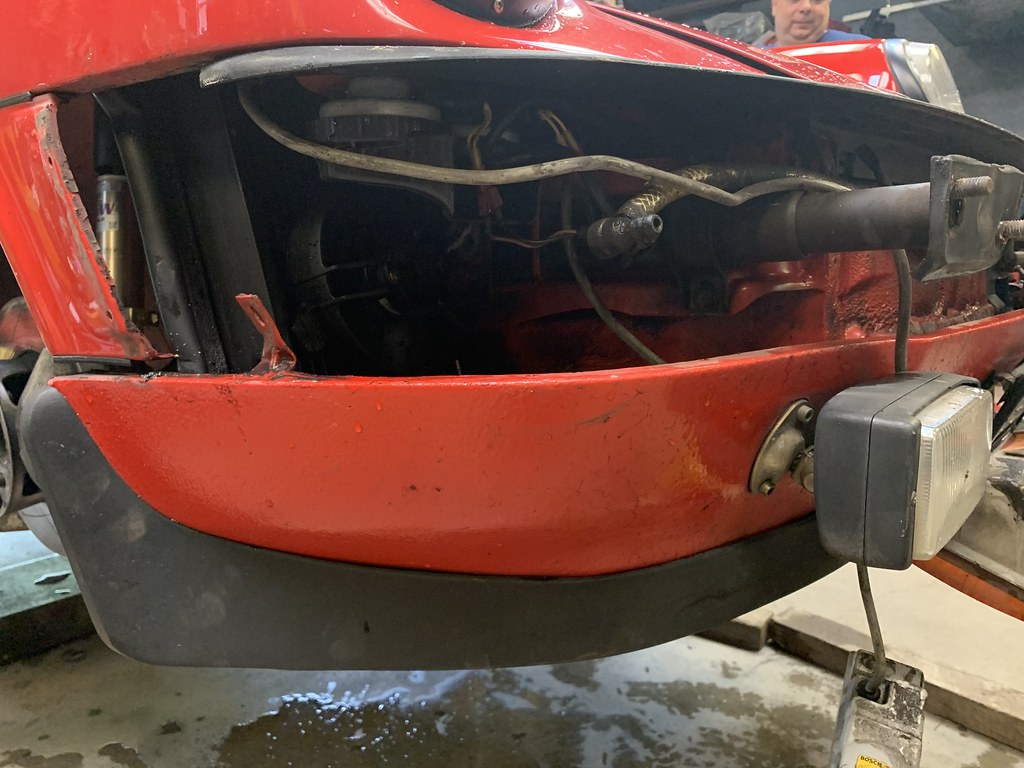
Before we could remove the front valence, the front foglights had to be disconnected. Removing the front lenses allowed for the internal assembly to come out and the foglights disconnected. It was then a matter of slipping the wiring through the grommet for removal. We could then tape up the connectors and zip tie them out of the way just in case I ever want to put them back (yea right).

Foglight  housing
Internal foglight assembly removed
Foglight wiring zip tied out of the way
With the wiring cleared up, it was just a matter of removing the nuts and bolts holding the valence in place. The old OEM front splitter was attached to the lower valence so removing the valence also conveniently removes it as well. My original splitter was actually cracked already when I bought it so I was able to pick up another used one that was in better condition and that's what we connected to the new valance. Installation of the new valence was pretty much just the reverse. We did have to drill the holes on the sides that the splitter attaches to and I got new hardware for the splitter since I wasn't sure what the condition of the old hardware was. I also got a new license plate mount since I didn't want the slowly rusting old one to fall apart on me. I think the new valence with the fresher splitter and no foglights really tidies up the front quite nicely and removes some weight up there even though it's pretty negligible. 

Side profile of new valence
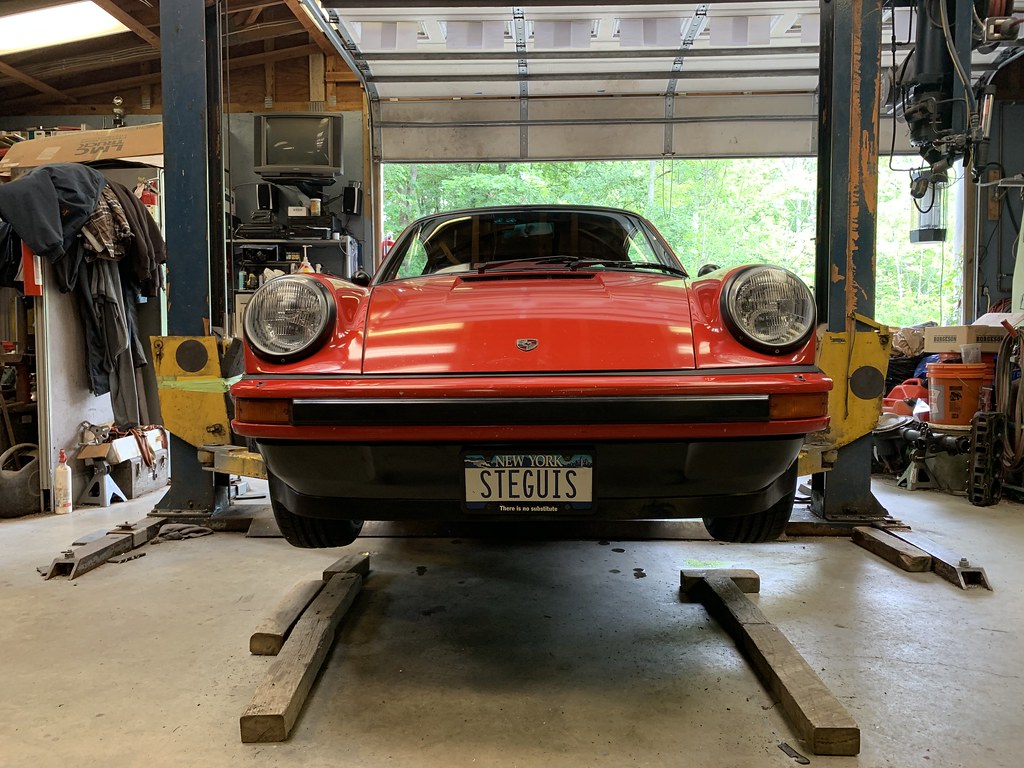
It looks pretty nice, even in black
After that was sorted and stuffing our face for lunch, we moved onto the rear. I had initially planned on replacing the original bumperettes with euro, slimmer style, bumperettes but after some contemplation I decided that removing them altogether would actually look best. We had to drop the muffler in order to get the 3 nuts holding each bumperette in place and because they'd been in place for 37 years, they needed some persuasion with a rubber mallet from the back to come off. 

Say good-bye to the "in your face" bumperettes
You also have to remove the license plate lights so the wiring can be disconnected before actually pulling the bumperettes off. The bumperettes weight in at a hefty 7 lbs each and considering they stick out all the way back there, they're adding weight in the wrong spot. They also add about 6 inches to length of the car unnecessarily. 

Bumperettes removed
I was pleased to see that the paint underneath was quite good but of course over the years some dirt and grime had found its way in there. We pulled the wire through and taped and zip tied them out of the way. After some cleaning, they looked half-way decent but with the obvious holes still in place. These holes are going to be welded shut before the car gets painted over so they'll be nice and smooth in the end.

Rear bumper cleaned a bit
SJF had the bright idea of using some red vinyl he had for decals that was surprisingly a good match for Guards Red and Jenna cut some small pieces to cover the holes. You can see them in real life but as you can see, they're almost invisible in photos or from a distance.

Red vinyl covering the holes
Finally, it was time to remove the stock plastic deck lid grille and install the perforated aluminum one from X-Faktory. This should be a simple job but since the car has AC, the condenser is in the way of all the nuts that needed to be removed. Still, after some patience and the three of us doing our part, we got the grille in and transferred the Luftgekuhlt emblem I had on the factory grille over. I think this grille is a simple detail that adds a touch of low key aggression and actually weighs less than the factory pieces (about half the weight). 

Factory plastic grille
New black X-Faktory perforated aluminum grille installed
This pretty much completes the external mods to the car. I have to think about how I'm going to do the rear license plate lights but frankly I don't really drive the car at night so it's really not that big of a deal. I'm super excited to get the car off to get painted later this year. I'm still waiting on replacement front and rear bellows since a few of the studs in my original ones are a bit screwed up and don't allow the nut to come on or off properly. I might also get new front and rear bumper strips since it probably makes sense to put in some fresh ones after the car gets painted. Overall, I'm really happy with how she's turned out. It's just the right amount of restomod without going full on outlaw and while I'm certainly going to get snubbed by purists, I think real Porsche enthusiasts can appreciate what's been done to breath new and exciting life back into this 83 SC. 

Sunday, August 9, 2020

Achtung Kraft Aluminum Bullet Style Side Mirrors

A lot of people don't like the big "flag mirrors" used by Porsche throughout the entire 80s. I don't really mind them. They're functional, they're powered and they kind of fit into the general shape of the car. While I don't mind them, I do think a small car like the 911SC looks great with smaller and more aerdynamic mirrors so when I found out that Achtung Kraft was making aluminum bullet style side mirrors with "flag" bases so they mount just like factory, I was sold.

Achtung Kraft Aluminum Bullet Style Side Mirrors - 8-9-2020
The first order of business was to remove the factory mirrors. This is surprisingly easy with the right tools but I'm documenting the steps here to help others in the future. First, I adjusted the mirror so they aim up as much as possible. I then just used a long flat screwdriver to pop the glass off. I was most worried about this step but surprisingly didn't get too much resistance. It's basically just held in place by 4 clips, no other glue. Next there are three 8mm bolts holding the motor housing to the mirror cover. Remove those gently, supporting the mirror assembly so it doesn't just fall out.

Remove the 3 x 8mm bolts
Once you pull it away you can see the connector for the motor. Simply disconnect. I suggest you disconnect the battery before you do the next steps by the way.

Disconnect that connector
This leaves you with the connector end that goes into the harness that snakes into the door. Unfortunately, this connector is too big to get through the hole where the wiring goes through. You have two choices here. One is to simply cut the wires which is not ideal if you want to reverse this later. The other is to use the right tool to de-pin the plug so you can pull the individual wires out.

Connector end we need to de-pin
Tool you need to remove the pins -
Delphi Packard Weatherpack Terminal Release Tool
Push tool into each slot then simply pull the wire out
The tool you'll need is a Delphi Packard Weatherpack Terminal release tool and they're only a few bucks from Amazon. When you slide them into each hole, they simply fold the little "wings" on each of the pins that secure them in place allowing you to simply yank them out. Once all the pins are free, turn the mirror forward and use a 4mm hex socket or allen key to loosen the top bolt which in turn loosens a "foot" that will eventually allow you to simply pull the mirror assembly away from the door. Again, be careful here and hold onto the mirror so it doesn't just drop onto the door.

Use 4mm hex to loosen upper base foot
Once you get the mirror off, gently pull the wires out through the hole until the mirror is completely free of the car.

Mirror removed with wiring remaining
The next thing I did was to electrical tape all the pins so nothing shorts and cleaned off the old grime between the mirror and door as best I could. Then, I fed all but one wire (the longest one) back into the door to get out of the way but looped that final one into the top mount hole then zip tied it into place. This way, the entire wiring harness won't fall into the door making it difficult to fish out again later.

Door cleaned as best I could and wiring tucked away
The new mirror has an integrated gasket and mounts the same was as the factory mirrors. Although the base matches that of the flag mirrors, it is a bit smaller so if you have imperfections in your paint where the old base was then that'll be visible. I'm not concerned since the car's getting repainted anyway soon. The mirror is not powered and you simply loosen the 3mm hex bolt on the back so you can move the mirror around as needed to adjust for vision. The mount itself has two positions for where the top foot sits in this new mirror and for me, they arrived reversed so I just switched the spots and that aligned things nicely. Also the upper aluminum foot fits but is a bit wider than stock so I recommend getting the top foot in first then get the two bottom feet in. That'll make things align more quickly then it's just a matter of tightening everything down.

Driver side mirror installed
The passenger side was a little tricky. The passenger base is actually angled a bit more acutely than the driver side (even the factory ones are this way) making tightening down that bolt really hard. I could only get one click of my ratches at a time. If you only have an allen key that is simply not going to work. I'd recommend a fine tooth 1/4" ratchet with an appropriate 3mm hex socket to make your life easy.

Tight space on passenger side to tighten
It's totally worth all the effort though. It looks so snazzy. The mirror is convex so you have quite a lot of visibility including more of the road if you're trying to parallel park and want more visibility on how close the curb is. Obviously, as with all convex mirrors, you have to remember objects are very much closer than they appear but it's not that hard to get used to (plus you should be looking over your shoulder anyway when changing lanes).

Passenger side mirror installed
Convex mirror
And just in case you forgot what the factor flags look like. Here it is:

Factory flag mirrors
The bullet style mirrors just look so good and I think they have better visibility that the popular Vitaloni Sebring small mirrors you see often retrofitted on to this car using the factory flag mirror bases.

Lighter and better looking
I really love how the black aluminum works with all the other little black accents on the car too. Kudos to Achtung Kraft for some of the cool products they're working on. I have another piece pre-ordered from them that I think will look super cool once installed but that'll have to wait until another post.

Little holder for a 3mm allen for adjusting the mirror.