Sunday, April 28, 2019

Final Practice before NJ ProSolo 2019

We're less than a week away now from the NJ ProSolo so despite the forecast for lots rain and cool temperatures, many of us braved the elements to get our final practice in. In order to try and get people dry runs, we split up two heats running twice, once in the morning and once in the afternoon. This turned out to work out quite well because the rain eventually passed towards the end of the morning session and the winds helped dry most of the lot.

NNJR SCCA Autocross - 4-28-2019
This meant that everyone got a chance to run in the dry for the afternoon runs so the morning times were thrown out (treated as a TnT) and afternoon counted as points. This sadly didn't matter to me because I was the only one in STU but I was mostly just in it for seat time. It's been almost a month now since my last autocross. I can't say I was too happy with my driving. I still keep hitting cones on the right side but looking at the video I'm getting really close on the left so I'm working on cutting distance at least. I also lowered the front compression one click since she seemed a bit pushy and that helped massively with making the front work better (note to self: front compression is now set to 9).

NNJR SCCA - 4-28-2019

Since it doesn't look like STU is making a full class for the ProSolo that means we're going to be moved into bump class (probably up against the karts). Between that and the car just not wanting to be launched and wheel hopping when I try, I think I'm not even going to try and launch the car to preserve the drivetrain.

Saturday, April 27, 2019

Advan A052, Good-Bye Whinebro, Zunsport Grill

Now that Bumblestook is, for the most part, sorted and operating normally again, I can get back to refining her. But before that though, Yokohama released a new version of their Advan A052 tire. This new version has a different part number and is listed as 7/32" tread depth which now makes them legal for SCCA Street Tire classes. Although Bumblestook doesn't compete in anything specific to SCCA anymore, I thought it'd be good to pick up a set of 255/40/17 Advan A052 and test them out so I can make a decision on whether I want to move to this tire for Kay.

Super Fresh Advan A052 - 4-27-2019
My first impression with this tire is that the tire wall is stiffer than the Bridgestone RE-71R. They also don't have the little "lip" that the Bridgestone has to protect the rim if you suck at parking and get too close to a curb. I'm very familiar with how Bumblestook feels on different tires and it seems the front is a bit more responsive and these tires are definitely sticky. Time will tell how good these are in different temperature conditions. There's only so much you can feel on public roads.

Tires getting mounted
Tires mounted and back on the car
The main focus of Bumblestook's build is primarily a street car that can be used for anything, "one car to do it all". One of the little things that has been annoying me was the constant electrical whining sound from the fuel pump. I've had a Walbro 255lph fuel pump for several years now and while it's super convenient because it's a drop-in replacement for the stock fuel pump, it's also known to be a bit noisy (a.k.a "whinebro"). I have no need to have a higher rate fuel pump since I don't plan on increasing power any further so I ordered a new OEM fuel pump assembly. It's more than adequate for my power needs and is ultra quiet.

Taking out old fuel pump - 4-27-2019
New fuel pump and filter installed - 4-27-2019
Old Walbro fuel pump
I've been getting a really annoying rattle from the front bumper. This was due the grill being loose and rattling around due to a broken tab. To fix this without having to buy a new grill, I picked up some 4.7mm push in clips and SJF drilled holes so everything is held securely in place.

Loose grill, Comparing clip with the existing bumper hole
New hole drill and clip installed
Finally, I've been wanting to add a mesh grill to prevent leaves from getting into the intake snorkel. I've been using Zunsport grills from the U.K. on the Cayman and found their quality to be very good so I checked if they had any S2000 ones and sure enough they did. This should've been an easy clip-on installation but with my front tow hook installed, SJF also had to cut some of the grill away to clear it. It's actually made of pretty thick steel and not just chicken wire so a cutting wheel was required. A quick splash of paint was thrown on to prevent rusting. To fully secure it, we also added two zip ties to hold it onto the center part of the grill. I think it came out really well and the added protection to the various radiators and coolers behind it is always a good thing.

Adding tape to prevent scratching of bumper cover
Hole for Front Tow Hook done
Zunsport grill installed - 4-27-2019
Thanks again to SJF Performance for making time to get these out of the way. I only have to chase one final rattle somewhere on the passenger side interior that only occurs at 3500 rpms and I'll be completely happy with the comfort level of the interior.

Saturday, April 20, 2019

New Clutch, Flywheel and HFC

The new clutch, flywheel and high flow cat arrived last week but with very little free time the next few weeks, I had to call in reinforcements in the form of Robert Thorne to get Bumblestook up to speed asap. Thankfully, Robert was kind enough to fit me in today and got the car sorted in no time.

Thorne getting ready to drop the transmission - 4-20-2019
(Also reunion with the The Big Bad Wolf
The first order of business was to inspect the Berk high flow cat which I was suspecting was the cause of my power loss. While the cat had seen better days, the inside wasn't collapsed or blown apart so I really don't think it failed. However, since I already got a new EVS Tuning 63.5mm cat, I figured it would be a good time to swap it in anyway. The pictures aren't in chronological order. Obviously the new cat went in last since the transmission had to go out which also meant moving the engine around. What I need to find is an HJS 200-cell core like the one in the STU Cayman and have Robert make me a high flow cat that is going to for sure be much more reliable and better flowing.

New EVS Tuning HFC (top), Old Berk HFC (bottom)
EVS HFC installed - 4-20-2019
This is not the first time Thorne's dropped an S2000 transmission. He had lots of really cool shortcuts to get the trans out without dropping the subframe or the header saving a ton of time. I won't go into those details here but not having to do that meant saving time and more importantly not upsetting my alignment.

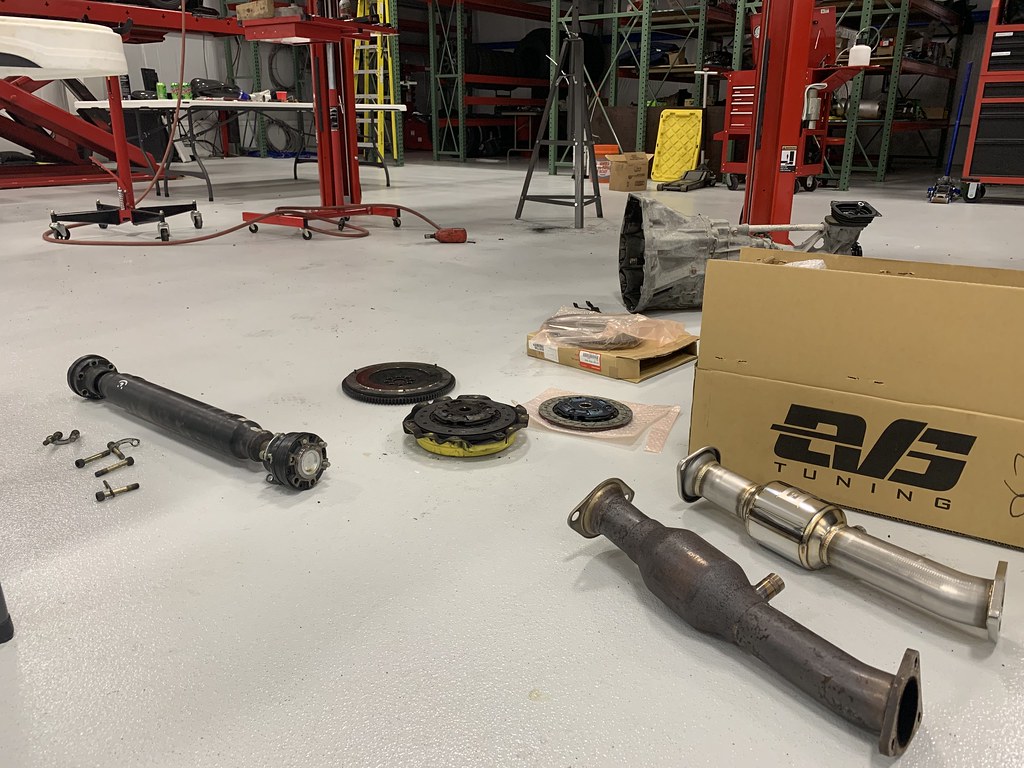
Driveshaft, Transmission, Clutch and Flywheel off the car
One of the surprises we got when he removed the driveshaft was a bunch of transmission fluid spilling out of the output shaft flange cavity. That's supposed to be dry! Thankfully the flange of the output shaft and the drive shaft is so tight that it never leaked on the outside so the fluid was contained in that space. Turns out, when we replaced the output flange from AP1 to AP2 last year, the little O-ring, must've still been stuck to the old flange. It's not obvious that you need an O-Ring here since there's yet another teflon ring that goes on top of that. Thankfully Robert has spares of everything and this was quickly remedied by him stealing the O-ring from one of his spares. The part number is 91301-PCY-003 for future reference.

Output flange with missing O-Ring
Now we got to inspect the clutch and what we believe is the real cause of the power loss. The clutch must've been slipping a lot. It's totally worn down all the way to the rivets on the flywheel side of the friction disk. This clutch has only seen about 3000 miles in total but most of those miles were very hard miles and I'm sure the years of ProSolo launches did not help. I went with a new OEM friction disk because it's more than capable of holding down power. Even the turbo guys use this. The springs were also beginning to rattle a lot but at least they were still in place.

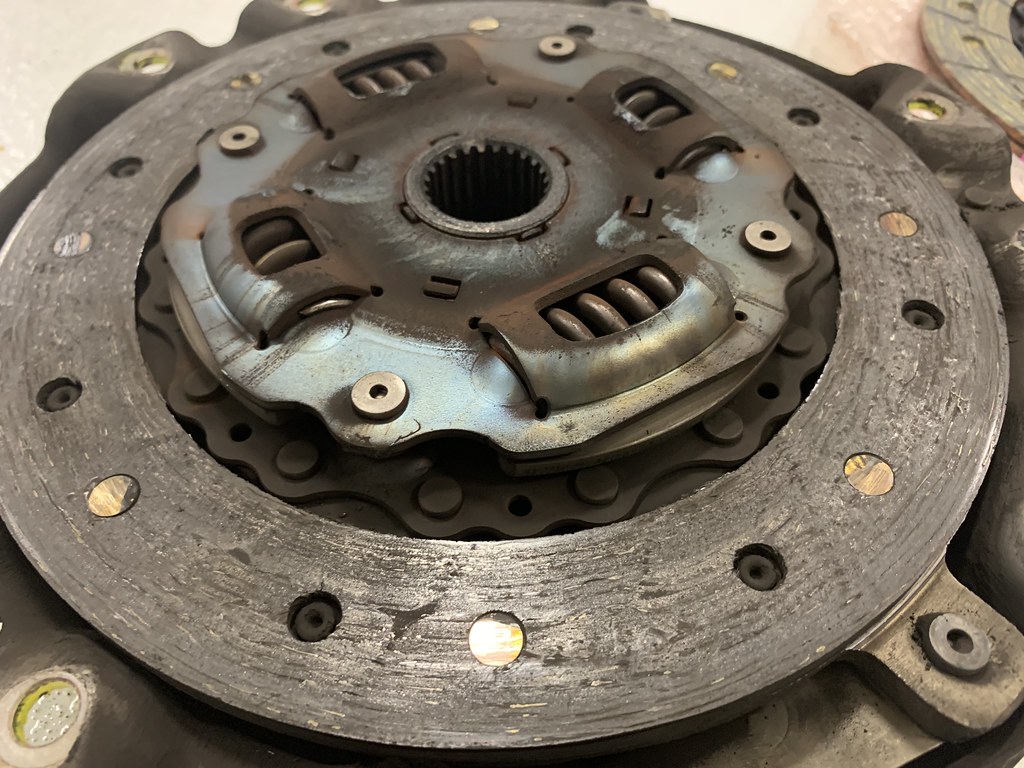
Heavily worn old clutch. 
New OEM friction disk
As for the old 11.5 lb Competition Clutch flywheel, well it had its share of hot spots probably from those crazy high RPM launches. This time, I went with an OEM AP1 14lb flywheel. I think it's the perfect street performance flywheel. It's just the right weight to make it easy to drive on the street while still being light enough for quick acceleration and heel-toe. You also can't beat OEM quality. The car is "almost stock" after all.

Old Competition Clutch flywheel
New AP1 Flywheel installed with new bolts and washer- 4-20-2019
As is always recommended when doing a clutch job, the release bearing guide was also replaced along with a new throwout bearing.

New Release Bearing Guide
New throwout bearing
I did have Robert reuse my ACT HD Pressure plate. In hindsight I probably should've gotten a new one since I've already gone through the trouble of buying all new parts but it's too late now. The condition is "ok", not horrible but also not excellent. We'll see how it holds up.

Car all done  4-20-2018
I will say though what a massive difference the car feels now! Although I am still taking it easy to break the clutch in, I can already feel it grab so much better. Even at part throttle, accelerating in 2nd, I can feel a massive difference in acceleration. There's no doubt in my mind the power loss was fully attributed to the bad clutch. I'm super glad I got this taken care of now because I'm going to be able to go the S2k Takeover of NYST next month will full confidence that everything is as it should be.

Here are the OEM part numbers for everything replaced including their current prices from Majestic Honda. I compared this against the last time I bought OEM parts and these prices have gone up quite a bit in the last few years. I should probably buy another set to keep as a spare for the future.

Part Number
Part Name
Price
Quantity
Total
22100-PCX-005
Flywheel
$314.41
1
$314.41
22200-PCX-055
Disk, Friction
$172.89
1
$172.89
90429-PCX-000
Washer (38X88X2)
$13.00
1
$13.00
90011-PCX-B01
Bolt (12MM)
$4.50
8
$36.00
90034-689-000
Bolt, Twelve Point (8MM) (Tokai Trw)
$5.81
9
$52.29
22810-PCY-003
Bearing, Clutch Release
$157.00
1
$157.00
21103-PCY-003
Guide, Release Bearing
$34.02
1
$34.02

Overall I'm super happy with the results. Big thanks again to Robert for the clutch save (pun intended). Even just hanging out at the shop and checking out their cars there was a lot of fun. It was also cool seeing The Big Bad Wolf again. The last time these two cars were this close was back in our days competing in BSP. What totally different directions we've taken our cars since then. 

Saturday, April 13, 2019

Compression Testing

After the very concerning drop in power measured by the dyno when Evans Performance Academy was recording the "live tuning" session, I wanted to do some basic sanity checks to make sure the engine was in good health. We were already suspecting a failing catalytic converter so while I wait for the replacement to get here, I figured I'd go and pull the plugs and do a compression test with Rad's help.

Um the non-zero zero point for the gauge lol - 4-13-2019
The gauge I got actually read zero when we first started but I didn't secure it properly to the hose so during the first test the gauge actually flew off the hose onto Rad then onto the header then onto the ground haha. I think that messed up the needle position so I'm noting that the actual "zero" for the gauge is at 20psi so I'll subtract that from all the readings. I followed the instructions from Rob Robinette (https://robrobinette.com/S2000Compression.htm) which has me testing the compression with the engine at operating temperature. This worked out nicely since I drove over to Rad's house to do this anyway so the car was warm when I got there. I'm going to note here that the oil temperature when these measurements were taken was 152F. The tests measured 251,249,240,249 (pictured reading - 20psi):

Cylinder 1 - 251
Cylinder 2 - 249
Cylinder 3 - 240
Cylinder 4 - 249
Not quite sure why Cylinder 3 is reading lower than the rest but it's still within the acceptable deviation. I looked back from when I bought this engine from David Goatly and all cylinders were at just over 240 so I think this is fine. I'll keep an eye on this cylinder in future tests to make sure it doesn't drop below 240. The sparks plugs are looking ok too (the photo has it look quite a bit darker than it is in real life).

Spark plugs in order with cylinder 1 on the left - 4-13-2019
I drove her about 200 miles today and she drove smoothly as ever and the clutch slippage felt on the dyno and during testing afterwards is not as bad now. I'll be changing the clutch and flywheel anyway since I don't want to wait for complete clutch failure at some future event and have to try and limp it home. Not having a trailer anymore really makes you care about reliability. At least for now I'm more at ease since there's no indication that the power loss is due to something bad inside the engine. I also sent the oil sample from the last oil change over to Blackstone Laboratories so I'll be eager to see what the result of that analysis is.

Alcantara GT2 Seat Inserts

I really love the carbon GT2 seats in Kay but my biggest gripe with them is that it's all black leather. It makes it easy to clean but boy do they get hot in the sun. When I bought them a few months ago I contacted Heritage Upholstery in California. They specialize in restoring classic car interiors but as most of these shops do, they also do some bespoke work for cars like Porsches.

Alcantara GT Seat Inserts - 4-13-2019
Compared against all leather seats
I specifically wanted Stone Grey Alcantara inserts to match the rest of the interior. Unfortunately, these have become very hard to come by as a global shortage in Alcantara means suppliers only sell to OEM manufacturers. After a month or so of looking, they were able to source the material for me from Europe and about 3 months later in total, they're finally here and I think it adds a really nice detail to the interior.

Black leather left, Stone Grey Alcantara Right
One of the reasons I picked Heritage Upholstery is that they actually source factory molded cushions so I know I'm going to get OEM fitment and quality. Buying a new set of cushions was a great choice because it's obviously nice when everything is new but also because I can store the original ones if I decide to sell the seats later.


This completes the interior now to my satisfaction.

Alcantara GT Seat Inserts - 4-13-2019

Monday, April 8, 2019

Evans Performance Academy - Live Tuning

I go by the philosophy that if you want success you need to surround yourself by the best people to help you in the areas you know the least about. Jeff Evans of Evans Tuning is probably one of the best tuners in the country and I've relied on him heavily over the years to help me squeeze good, reliable, usable power from my cars including Bumblestook's ITB setup when she was still in full race car BSP trim. It was no surprise then that when Jeff reached out to me about collaborating and using Bumblestook to film one of his "Live Tuning" videos, I was more than happy to do so.

Evans Performance Academy - 4/8/2019
In 2018 he started a new venture called Evans Performance Academy where he's taken his years of experience tuning thousands of cars to create extremely valuable training videos so you can learn about the concepts of engine tuning and even tune your car yourself all from the comfort of your own home.

Evans Performance Academy - 4/8/2019
Even if you're not a tuner or don't intend to tune your car yourself, these videos are really great for understanding how your cars are tuned so you're better informed about what's going on under the hood. He covers lots of different ECU tuning systems and cars so this is definitely not the case of being a one trick pony. To have a master of his craft share this much information is pretty rare and the staggering growth of his subscribers and offerings is a testament to its value.

Evans Performance Academy - 4/8/2019
If you're interested in this kind of content, I highly recommend you check out his website and sign up. You can preview some shorter snippets of this content on his YouTube channel.

Gratuitous Engine Bay Shot :D
Also, keep an eye out for this episode when it gets released soon if you want to know how to tune your S2000 with the Haltech Pro Plug-in ECU.

Full throttle run on low cam tune - Evans Performance Academy - 4-8-2019

I was hoping to end this post off with a nice dyno graph showing the great power she makes but sadly that's not the case today. As you can see the in the video, the engine sounds fine, pulls smoothly with no stumbling or misfires. However, the dyno graph showed a big power loss. I'm down almost 25hp and about 15 ft-lb of torque. Just to make sure the issue wasn't the new tune, we loaded my original tune and it still showed low power figures though Jeff was able to get torque gains in the low end with the new tune. Since the engine seems to be running fine, Jeff believes something is backing the system up and he suspects my high flow cat has started to fail as he's seen similar behavior on other S2000s where this has happened. We test drove it on the street and it accelerates fine but you can definitely tell the power falls a bit flat on the high cam in VTEC.

I looked back at my previous posts and find the bonehead thing I did last year when we were putting the car back together. Instead of putting in a new high flow cat, I reused an old high flow cat from my other S2000 at the time (http://bumblestook.blogspot.com/2018/01/suspension-brakes-and-exhaust.html). To quote that post "To get back to being street legal, Lupa's old Berk 63mm high flow cat and Mugen Titanium Sports Exhaust was installed"...ugh! We also discovered that my clutch is slipping a bit. I'm not overly concerned about the clutch slip. I was thinking about swapping in an AP2 transmission back in anyway so I'll take that opportunity to replace the clutch. She's still on her original clutch from her BSP days and was installed during the winter of 2013. It survived over 5 years of insane 8000+rpm clutch dumps for ProSolo lauches and a few track days. It only has probably 4000 miles in total on it but those were some pretty harsh miles. It's fine on the street and I think in the lower gears she'll survive running at NYST next month since that's only a medium speed track. I do need to fix this power issue though, because if it is the cat, then if it completely clogs I could hurt the engine.

I wish the narrative was better but such is life. On the bright side I found out I was having an issue in the best place possible, on the dyno, in a nice controlled environment. I'll get this fixed of course but I'm a bit disappointed. I was really hoping all the cars would be done with major mechanical work this weekend but you don't always get what you want.

Sunday, April 7, 2019

Post-Winter Maintenance

She's been under wraps for 4 months straight and last weekend I got a chance to take her out for a few hours to burn off the remaining fuel in the tank from last season, fill her up with some fresh fuel and in general let her stretch her legs. As much as I've been having fun prepping Kay the Cayman over the winter, it was very clear to me why I love this car so much. It's just so much more raw, nimble and responsive. It just brings such a big smile on my face every time I take her out.

SJF Performance - 4-7-2019
Today I went to SJF Performance to get her post-winter maintenance done which means changing the engine oil, trans fluid and diff fluid so we can start the season fresh. I didn't change the oil after Watkins Glen last year so I'm sending this oil sample into Blackstone labs for analysis to compare against my first baseline earlier last year. I also bought a limited production Mugen 1.5.2 throwback oil cap from King Motorsports as a little bit of engine bling since my oil black Mugen cap was starting to look a bit tired. 

Fresh Fluids - 4-7-2019

Mugen 1.5.2 oil cap

I had the wrong sized remote adjusters for the Ohlins FVD dampers shipped to me last year. They shipped replacement ones and I fixed the side by the spare tire location since that's easy to get so today we got to the side by the fuel filler neck since that side's a bit of a pain. To be honest I'm still not happy with these remote adjusters. They just don't feel as precise as they should be but I won't be adjusting the shocks much going forward so this is mostly a convenience item at this point. I also finally noted down what my shocks settings are since I don't recall every writing them down:

Front: 13
Rear: 17

Remote adjuster on left rear damper - 4-7-2019
Finally, it was time to her back on the alignment rack as I always do at the beginning of each season. Surprisingly the front didn't change much after a year of driving a few autox and track events but the rear toe was definitely out of spec, enough that I had to drive the wheel turned left about 10 degrees. That was quickly remedied by Steve and we're now back to perfect alignment handling like she should.

Alignment - SJF Performance - 4-7-2019
Alignment specs:

Front: 
Camber: -3
Caster: 4.3, 4.8
Toe: 0

Rear:
Camber -2.3
Toe: 0.06in per side (0.12in total) toe in

Now she drives perfectly again and just in time. Tomorrow we've got something a bit different lined up so stay tuned...

Maintenance Logs: 53,984 miles
- 6 qt Amsoil 10W-30
- 2 qt Amsoil Manual Transmission Fluid
- 1 qt 80W140 Diff fluid

Friday, April 5, 2019

Modified Keyfob

I'm going to start off by saying that this is a very common mod for 987.1 and even 997.1 owners. The problem is that the OEM keyfob is overly sensitive and sometimes just the act of putting it in your pocket unlocks and opens either the trunk or the frunk. At the very least this is annoying and at worst it could mean walking away from the car with one of those open, leaving the light on and draining your battery. This is why you'll see many owners hold their keys until they're far away from their car. I've personally gotten used to only putting it in my bag or in my looser jacket pockets but never in my jeans.

Ready to start the keyfob migration process - 4-5-2019
Replacement keyfobs are cheap and easily found on Ebay or Amazon. They're also a bit beefier and have the shell used in the 987.2/997.2. The first step is pretty easy, simply open up both keys, release the latch for the actual key and transfer it over and then transfer over the battery and battery terminals as well as the button circuitry.

Moving the guts over - 4-5-2019
The scariest part of this process is that you have to transfer over the transponder used by the immobilizer from the OEM key to the new key. The transponder is glued onto the OEM key shell so you really don't have a choice but to completely destroy the old key shell to get the transponder out. Doing this carefully, it took me almost all of watching the latest episode of the Grand Tour to get that done. Note: If you buy an actual new Porsche key from the dealer it includes a new transponder and you then need to reprogram it to the car. That costs a few hundred dollars in total. This method costs about $20 but is a one way process. 

Transponder extracted and ready to move over - 4-5-2019
You then just combine the two halfs of the shell being careful not to pinch the contacts so the buttons engage properly (this took me a dozen tries since it's a snug fit) and you end up with a sweet new keyfob that both looks better and is no longer the sensitive mess the original ones are.

Old keyfob (top), New keyfob (bottom)
Old keyfob (bottom), New keyfob (top)
I bought two of these new shells so I could convert both keys but I think I'm going to just hang onto it and keep one of them original just in case I ever have a problem.