Tuesday, September 29, 2020

NJMP Thunderbolt with S2K Takeover

We were supposed to be at NJMP with S2K takeover earlier this month with Global Time Attack and SCCA TNIA but that event got cancelled. Thankfully, Brad was able to get us in with NETC instead yesterday which turned out to be great because S2K Takeover had our own session so there were only S2000s on track when we ran which made things super fun. 

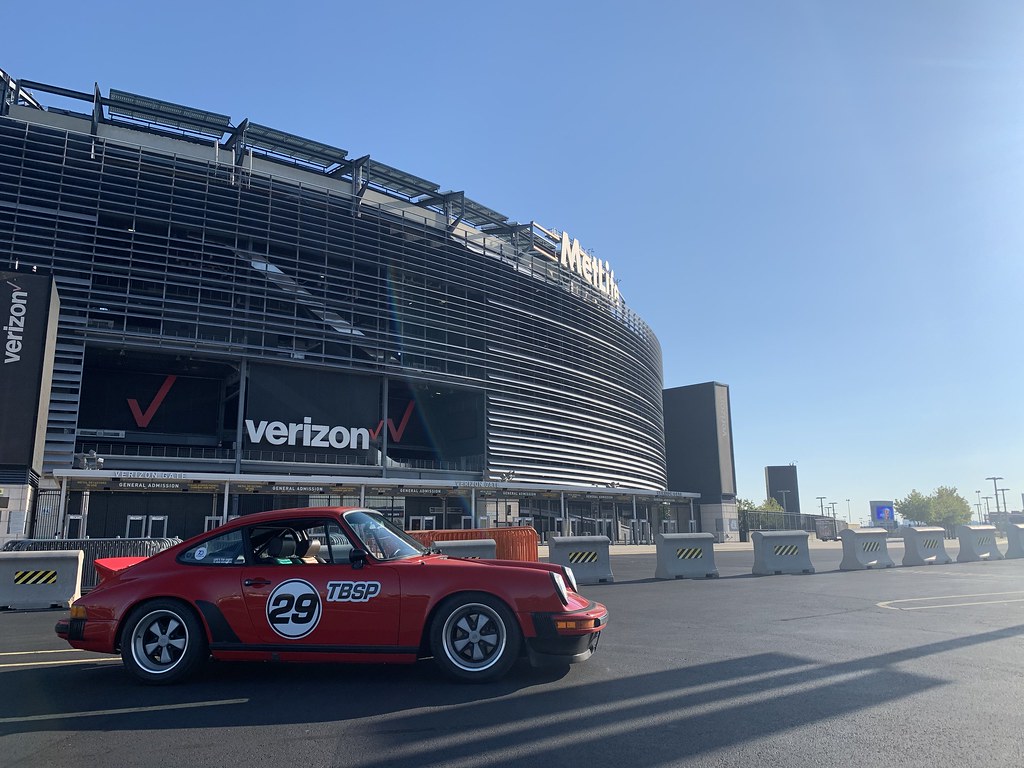
NJMP Lightning - 9-28-2020
Photo By: Ben Tiu

It's been over 8 years since I last ran at NJMP Lightning. Last I went in Bumblestook, she still had her F20C and big wing. It rained heavily the night before but thankfully it was bone dry by the time we ran. The track is still as fun as I remember and it was an excellent learning opportunity to follow some of the fast S2K track guys to learn their lines. This is definitely a track where aero is highly beneficially to gain lots of confidence in keeping the rear settled. I found myself having to back off a bit to keep the rear in check during quick transitions but at the same time I was also struggling getting the nose tucked in during some of the faster sections like the light bulb. 

Andy filling up my side mirrors

I was able to get into the 1:20 lap time after I remembered to check my tire pressures which had risen quite sharply throughout the day and way out of the optimal tire pressures for the Yokohama A052s. Just lowering them down to 28psi/27psi helped me find 2 seconds in my final session. I think more time can be had by doing some minor tweaks on the dampers and maybe swaybar settings. I'm resisting all temptation to get big aero, big brakes and R-comps and turning the car into a dedicated track car. I think there's still plenty of time on the table as is. There's quite a bit of self-preservation going on here since I do actually care about this car so I'm not actively trying to stuff it into immovable objects by going full send. I just need to find the right balance between fast and safe. Not trailering and having a strong desire to drive the car home on its own power are strong incentives to not roll the dice. NJMP is thankfully more forgiving than other NorthEast tracks with adequate runoff in most sketchy areas so there's at least that if I can accept going into lawn mower mode once in a while. 

Bumblestook @ NJMP Lightning with S2K Takeover

Unfortunately, this is my last track event for the year.  Hopefully next year will be a bit more normal so I can actually get the cars out to more events. 

Tuesday, September 22, 2020

Raising Ride Height and Re-alignment

The springs on the GTi settled a bit more than I wanted and it sat low enough that I kept hitting the fender liner on random bumps and dips in the road. I opted to raise the car about 3/8" all around and realign it at SJF. It's much better now but I still get a bit of rub if I hit a really big dip in the road. Nothing to be really concerned about.

Ride height increased - 9-20-2020
New alignment - 9-20-2020

It was also fortunate that I was there since we noticed there was a nail in my right rear tire but was thankfully barely leaking any air. We got it plugged for now while I want for a the new tire to arrive.

Nail in the right rear tire


Saturday, September 19, 2020

New Accelerator Pedal

I received my new Rennline Rev2 fully adjustable accelerator pedal so I wanted to get that installed today but before I got dirty from messing around in the footwell, I went ahead and installed a few interior pieces that also came in. First up was the Scarlett badge in Magneto font in a brushed finish by Kyle at Rebadge.com. It took almost a month to get it but it was worth the wait. Fits perfectly on the glove box door for a nice little personal detail.

Custom "Scarlett" Badge - 9-19-2020

Unfortunately, air-cooled 911s don't have any adjustment in the steering wheel position and the steering wheel was just a little bit further away from me than I would typically prefer. I found out that Momo made a 15mm spacer that included longer bolts. It surprisingly makes quite a difference as my arms are at a better angle so I feel I have better leverage on the wheel and as a result, better control. It also moves my fingers away from the dash further so there's less chance of hitting the indicator or wiper stalks when I'm turning.

Momo 15mm Steering Wheel Spacer

Momo 15mm Steering Wheel Spacer Installed

Momo 15mm Steering Wheel Spacer Installed

The factory accelerator pedal is removed by simply taking out the two 10mm bolts at its base and disconnecting it from the rod ball end. I had assembled the new pedal at home taking a rough guess at where I'd want the pedal to sit. There are so many levels of adjustment you can go nuts tweaking it to your preferences. The main thing I was after with this pedal is that the throttle rod is bolted into place rather than just being popped into a hole using friction. I can also raise the pedal more to make heel-toe easier. 

Removing the two 10mm bolts at the base of the factory pedal

Rennline Rev2 Fully Adjustable Pedal (left) vs
Factory plastic pedal with Rennaline aluminum cover (right)

New pedal attached to rod end

I got lucky that once I installed it, the position was pretty much spot on right from the start. I may make some minor adjustments in the future but it feels pretty good where it is now. One thing I noticed driving the car around after installation was that the added weight made it require a bit less effort to actuate the throttle. This made my throttle movements smoother. It even made rev-matching easier. I would definitely recommend this setup for anyone that wants a very reliable high-quality adjustable accelerator pedal setup on their 911. 

New Rennline Adjustable Throttle Pedal Installed


Sunday, September 13, 2020

New Bellows, Seals and License Plate Lights

When I took the tail light lenses off to install the new LED exterior bulbs, I noticed that the rubber seals to keep water out was falling apart. I guess none of the previous owners in the past 37 years thought it might be a good idea to replace the rubber. I also noticed that in the passenger side tail light housing, the rubber drain tube was completely missing. I picked up some new seals to replace both sides as well as a new rubber drain tube and put them in.

Old word out tail light seals - 9-13-2020
Old seals removed
New drain tube
New tail light seal installed
While I was doing this, SJF was replacing all the bellows all around. There was nothing wrong with them cosmetically from the outside but at least two bellows had nuts that were seized so they couldn't be removed without destroying them to some extent. It took me almost 2 months to get replacements and I didn't want the body shop to have to struggle with this so I wanted to get this done ahead of time. I also wanted to ensure that the new bellows fit the way I wanted since I opted to get good quality reproduction ones rather than the original Porsche parts. Fitment was about 9.5/10 but good enough and for something that's just basically rubber non-structural pieces, it didn't make sense to go spend money extra on the originals.

Front bellow removed
New front bellow installed
When we replaced the rear bellows, I also bought better condition used bumper side panels. The original ones on the car looked pretty beat up and I wanted the body shop to start with a better panel when it goes in for repaint.

Rear side panel and bellow removed

New bellow and cleaner rear side panel trimmed for exhaust
clearance and installed
Right rear side panel and bellow installed
Finally, I needed a way to illuminate the rear license plate after removing the bumperettes. I bought two potential options. The first was a pair of black Hella license plate lights that would sit on either side of the plate. The second was an LED illuminated license plate frame. I opted to not use the Hella lights because they stuck out a bit too far. Since the car is driven day time 95% of the time, it didn't make much sense to have ugly black bumps stick out from the now clean bumper even when they weren't in use. The Radiantz LED license plate frame I got is nice and stealthy. When not in use it looks just like any normal black license plate frame but when I turn on my lights, it illuminates the plate from the top with just the right amount of light.

Radiantz LED license plate frame
Waterproof LEDs lining the top part of the frame
To install it, a small hole had to be drilled just behind the plate to allow the wiring to get through. Due to the placement of the wire, a notch in the license plate was also needed. The next part was to avoid getting the wire too hot from being in proximity to the muffler. SJF wrapped the wires in heat reflective tape and ran it above the bumper on the inside with metal zip ties.

New hole in the bumper to pass the wire through.
Wires wrapped in heat reflective tape and routed above the bumper
and connected to factory license plate light wiring.
License plate lights turned on. The color is white even though it
looks blue in the photo.

Sunday, September 6, 2020

First Autocross for Scarlett - Throttle Problems

You can argue track versus autocross until you're blue in the face but the reality is that there's nothing like an autocross to safely explore the limits of your car. With so many direction changes in such a short time and a variety of surface conditions (undulations, bumps, etc), you can really put your car and your driving through its paces. Needless to say, I felt that the best way for me to understand how the 911SC feels at the limit and to make sure everything is good before going in for paint would be to take her to an autocross, and today was the perfect day for it.

NNJR SCCA Autocross - 9-6-2020
My main goal was to find out if I have any clearance issues. I had previously hit the fender pretty badly with my front right tire due to low ride height and I wasn't completely sure if the slight roll we did a few weeks ago would be enough. My second goal was to get a feel for the dynamics of the car under threshold braking and in quick transitions. On my first run, I took it a little easy, trying to pay attention to everything I was hearing and feeling in the car. Although the run was slow I was relieved to find no issues with tire clearance. I was also surprised at how fairly well balanced she was. It wasn't nearly as tail-happy under braking or when lifting throttle as I was expecting and the diff was working well to put the power down with the limiting factor being the tires.

NNJR SCCA Autocross - 9-6-2020

On my next run, I was feeling more confident to really attack the corners and was finding better pace but in the final 180 towards the finish, I suddenly lost all throttle. It didn't seem like an engine issue, just that the pedal wasn't doing anything. I figured a throttle linkage came loose and after getting back in grid, sure enough, the accelerator rod ball end had popped out of the pedal. Seemed like an easy enough fix to just pop it back in. On my next run it happened again after a bump. It seems that the socket on the plastic accelerator pedal had worn to the point of not being snug enough to hold the ball in under more extreme conditions.

Accelerator rod ball end disconnected from the pedal
Socket on the pedal is a bit loose
A quick search of the issue indicated that this is common and the accelerator pedal is considered a wear item on raced 911s and people replace it every other year...yikes! Considering this is the original pedal from 37 years ago, I guess it makes sense that it eventually failed. For street driving, this probably would've just stayed in there forever but when pushed harder, it simply wouldn't hold up. I've since purchased something to fix this correctly rather than just replace it with another pedal with the exact same design Achilles heel. It blows my mind that such an important part of the car just relies on the friction of a metal ball inside a plastic socket to hold it all together.

This issue aside, I was really enjoying driving her. On the upside, this issue is pretty minor and the car otherwise was working really well. I think I'm going to change out the torsion bars to improve rotation a little and reduce the body roll a little. She's certainly not as fast as my other cars but it felt quite rewarding to gain that confidence to push this car in the corners in the few runs I got before I called it quits.


Setup Notes:

Dampers: middle all around
Front pressures: 32psi
Rear pressures: 35psi

Wednesday, September 2, 2020

Fender Roll

Now that the GTi is on the softer KW Comfort Sport suspension, I noticed the front tires were rubbing slightly on the front fender. I had already previously lifted up the fender liner tab to clear the 245s on the 18x8.5 +45 wheels but this time I figured I might as well get the whole fender rolled to avoid any further issues.

Front fender rolling - 9-2-2020
I went to see Dan and got the fender rolled pretty quickly. This has definitely reduced the amount of rubbing but it still does on big dips in the road. I suspect between the softer valving and low ride height, I'm actually hitting the fender liner now. I may have to raise the car a little or stiffen the front dampers to avoid this.

Front fenders rolled nicely
Ah the joys of modified cars!